2. Trees in Ivy
ivy does not have a tree class per se; rather trees in ivy exist as collections
of nodes. In ivy, a Node is a class that contains information about a node.
Nodes are rooted and recursively contain their children. Functions
in ivy act directly on Node objects. Nodes support Python idioms such as in,
[, iteration, etc. This guide will cover how to read, view, navigate, modify,
and write trees in ivy.
2.1. Reading
You can read in trees using ivy‘s tree.read function. This function supports
newick and nexus files. The tree.read function can take a file name, a file
object, or a Newick string as input. The output of this function is the root
node of the tree.
In [1]: import ivy
In [2]: f = open("examples/primates.newick")
In [3]: r = ivy.tree.read(f)
In [4]: f.close()
In [5]: r = ivy.tree.read("examples/primates.newick")
In [6]: r = ivy.tree.read(
            "((((Homo:0.21,Pongo:0.21)A:0.28,Macaca:0.49)"
            "B:0.13,Ateles:0.62)C:0.38,Galago:1.00)root;")
In [7]: # These three methods are identical
You can copy a read tree using the copy method on the root node. Node
objects are mutable, so this method is preferred over r2 = r if you want
to create a deep copy.
In [8]: r2 = r.copy()
2.2. Viewing
There are a number of ways you can view trees in ivy. For a simple display
without needing to create a plot, ivy can create ascii trees that can be
printed to the console.
In [9]: print r.ascii() # You can use the ascii method on root nodes.
                               ---------+ Homo
                      --------A+
             --------B+        ---------+ Pongo
             :        :
    --------C+        ------------------+ Macaca
    :        :
root+        ---------------------------+ Ateles
    :
    ------------------------------------+ Galago
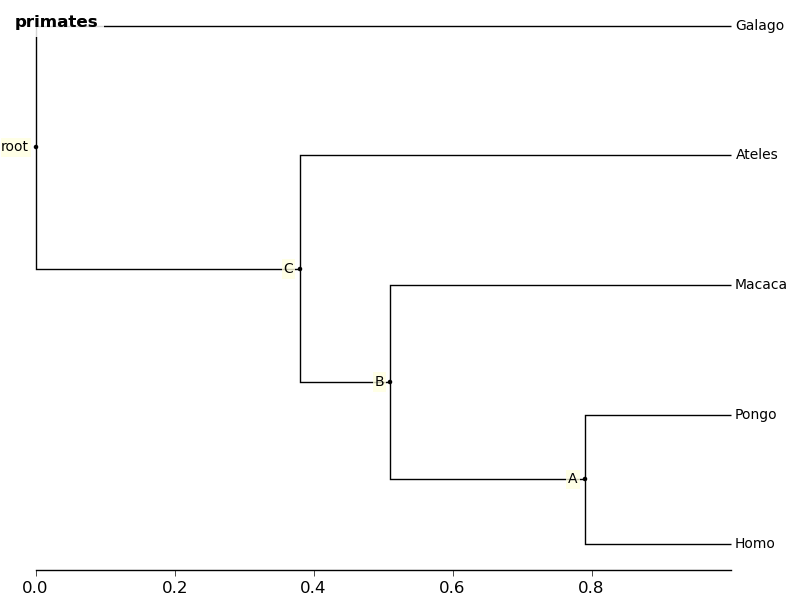
For a more detailed and interactive tree, ivy can create a plot using
matplotlib. More detail about visualization using matplotlib are in the
“Visualization with matplotlib” section.
In [10]: import ivy.vis
In [11]: fig = ivy.vis.treevis.TreeFigure(r)
In [12]: fig.show()

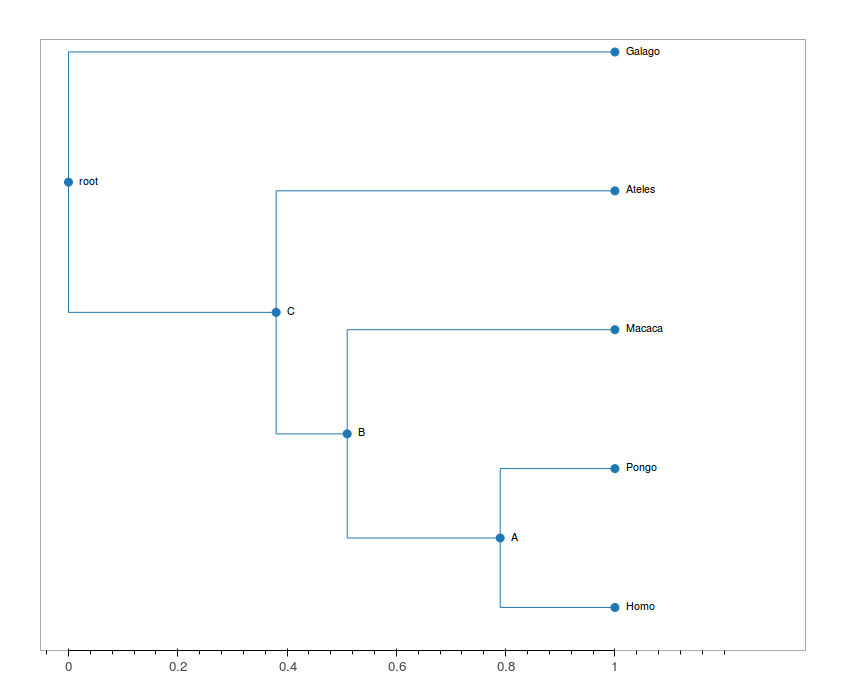
You can also create a plot using Bokeh.
In [13]: import ivy.vis.bokehtree
In [14]: fig2 = ivy.vis.bokehtree.BokehTree(r)
In [15]: fig2.drawtree()

2.4. Testing
We can test many attributes of a node in ivy.
We can test whether a node contains another node. Recall that a node contains all of its descendants as well as itself.
In [33]: r["A"] in r["C"]
Out[33]: True # Nodes contain descendants
In [34]: r["C"] in r["A"]
Out[34]: False
In [35]: r["C"] in r["C"]
Out[35]: True # Nodes contain themselves
We can test if a node is the root
In [36]: r.isroot
Out[36]: True
In [37]: r["C"].isroot
Out[37]: False
We can test if a node is a leaf
In [38]: r.isleaf
Out[38]: False
In [39]: r["Homo"].isleaf
Out[39]: True
We can test if a group of leaves is monophyletic
In [40]: r.ismono(r["Homo"], r["Pongo"])
Out[40]: True
In [41]: r.ismono(r["Homo"], r["Pongo"], r["Galago"])
Out[41]: False
2.5. Modifying
The ivy Node object has many methods for modifying a tree in place.
2.5.1. Removing
There are two main ways to remove nodes in ivy; collapsing and pruning.
Collapsing removes a node and attaches its descendants to the node’s parent.
In [42]: r["A"].collapse()
Out[42]: Node(140622783265744, 'B') # This function returns the node's parent and also alters the tree
In [43]: print r.ascii()
                            ------------+ Macaca
                            :
                -----------B+-----------+ Homo
                :           :
    -----------C+           ------------+ Pongo
    :           :
root+           ------------------------+ Ateles
    :
    ------------------------------------+ Galago
Pruning removes a node and its descendants
In [44]: r["B"].prune()
In [45]: print r.ascii()
    -----------------C+-----------------+ Ateles
root+
    ------------------------------------+ Galago
You can see that the tree now has a ‘knee’: clade C only has one child and
does not need to exist on the tree. We can remove it with another method of
removing nodes: excise. Excising removes a node from between its parent
and its single child.
In [46]: r["C"].excise()
In [47]: print r.ascii()
    -------------------------------------+ Galago
root+
    -------------------------------------+ Ateles
To recap:
collapseremoves a node and adds its descendants to its parentpruneremoves a node and also removes its descendantsexciseremoves ‘knees’
2.5.2. Adding
Our tree is looking a little sparse, so let’s add some nodes back in. There
are a few methods of adding nodes in ivy. We will go over biscect,
add_child, and graft
Bisecting creates a ‘knee’ node halfway between a parent and a child.
In [48]: r["Galago"].bisect_branch()
Out[48]: Node(140144821654480)
In [49]: print r.ascii()
    ------------------------------------+ Ateles
root+
    ------------------+-----------------+ Galago
We now have a brand new node. We can set some of its attributes, including its label.
Note: modifying a tree can have unwanted side effects for node indices. Watch what happens when we print out the pre-order index for each node:
In [50]: print [n.ni for n in r]
[0, 7, None, 8]
We would expect the indices to be [0,1,2,3]. We can fix the indices by calling
the `reindex method.
In [51] r.reindex()
In [52] print [n.ni for n in r]
[0, 1, 2, 3]
Now that we have fixed the indices, we can access the new node by its index and set its label.
In [53]: r[2].label = "N"
Now let’s add a node as a child of N. We can do this using the add_child
method. Let’s use a node from the copy of r we made, r2.
In [54]: r["N"].add_child(r2["Homo"])
In [55]: print r.ascii()
    ------------------------------------+ Ateles
root+
    :                 ------------------+ Galago
    -----------------N+
                      ------------------+ Homo
We can also add nodes with graft. graft adds a node as a sibling to the
current node. In doing so, it also adds a new node as parent to both nodes.
In [56]: r["Ateles"].graft(r2["Macaca"])
In [57]: r["Galago"].graft(r2["Pongo"])
In [58]: print r.ascii()
                ------------------------+ Homo
    -----------N+
    :           :           ------------+ Galago
    :           ------------+
root+                       ------------+ Pongo
    :
    :                       ------------+ Ateles
    ------------------------+
                            ------------+ Macaca
To recap:
bisect_branchadds ‘knees’add_childadds a node as a child to the current nodegraftadds a node as a sister to the current node, and also adds a parent.
2.5.3. Ladderizing
Ladderizing non-destructively changes the tree so that it has a nicer-looking output when drawn. It orders the clades by size.
In [59]: r.ladderize()
In [60]: print r.ascii()
                            ------------+ Ateles
    ------------------------+
    :                       ------------+ Macaca
root+
    :           ------------------------+ Homo
    -----------N+
                :           ------------+ Galago
                ------------+
                            ------------+ Pongo
2.5.4. Rerooting
Warning
This reroot function has not been thouroughly tested. Use with caution.
All trees in ivy are rooted. If you read in a tree that has been incorrectly
rooted, you may want to reroot it. You can do this with the reroot
function. This function returns the root node of the rerooted tree. Note that
unlike previous functions, the reroot function returns a new tree. The
old tree is not modified.
In [61]: r_reroot = r.reroot(r["Galago"])
In [62]: print r_reroot.ascii()
----------------------------------------+ Galago
+
:         ------------------------------+ Pongo
----------+
          :         --------------------+ Homo
          ---------N+
                    :         ----------+ Ateles
                    ----------+
                              ----------+ Macaca
2.5.5. Dropping Tips
You can remove leaf nodes with the drop_tips function. Note that
this function returns a new tree. The old tree is not modified.
This function takes a list of tip labels as input.
In [63]: r_dropped = r_reroot.drop_tip(["Pongo", "Macaca"])
2.6. Writing
Once you are done modifying your tree, you will probably want to save it.
You can save your trees with the write function. This function
takes a root node and an open file object as inputs. This function can
currently only write in newick format.
In [64]: with open("primates_altered.newick", "w") as f:
            ivy.tree.write(r_dropped, outfile = f)